Environments include elements of the rendering that are not part of the actual model geometry, but only appear when rendering.
You can think of the background as an infinite sphere surrounding the model. Backgrounds are projected onto this sphere. The background sphere is not an object that you can select, but a reference surface for the background effects.
The ground plane provides an infinite horizontal platform for the image that stretches to the horizon in all directions positioned at a defined elevation. The ground plane renders much faster than using a large planar surface as a base.
Turns the ground plane on.
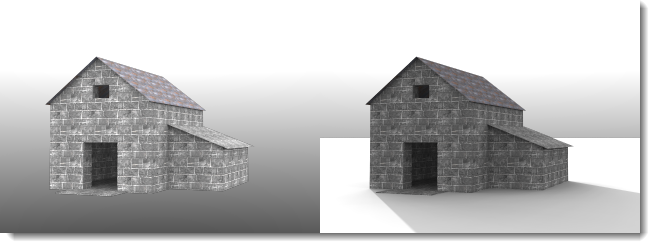
Ground plane disabled (left) and enabled (right).
Applies a transparent alpha channel to the ground plane so the image can be composited with the cast shadow into another image. See: Wikipedia article: Alpha compositing.
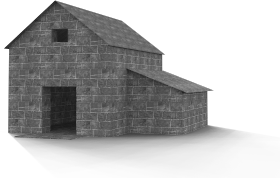
Ground plane shows shadow, but is otherwise transparent in the image.
Specifies the ground plane's height above zero.

Ground plane elevation above zero.
Assigns a material to the ground plane.
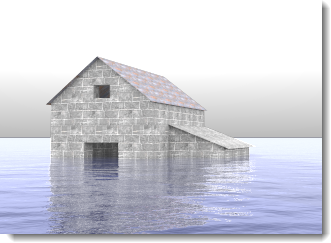
Ground plane with raised elevation and water material.
Note: A color background is always turned on, but it may be hidden behind an image or other background.
Modifies the relative brightness of the background.
Background type
Specifies the color scheme that will fill the background of the rendered image. Backgrounds can be of the following types:
The Sky environment uses the sun and sky settings from the Lighting tabs for settings.
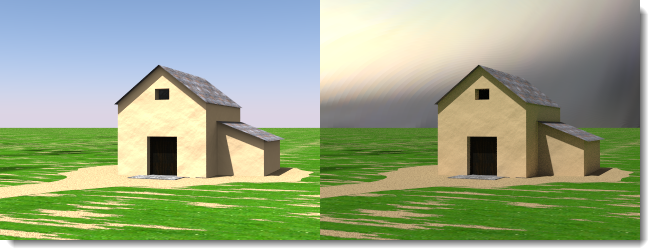
Automatic (left) and HDR image and sun (right).
A background color is always present, but may be obscured by images.
A solid color background consists of a single color that fills the background.
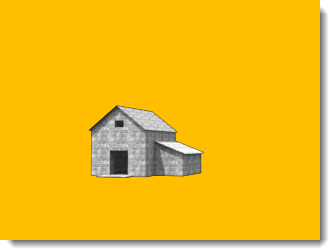
Solid-color background.
Note: Two- and three-color gradient backgrounds only apply to perspective views.
Two-color gradient backgrounds interpolate the background color between two selected colors.
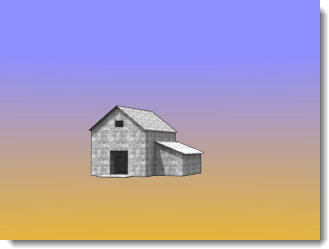
Two-color gradient background: blue and yellow.
Three-color gradient backgrounds interpolate the background color between three selected colors.
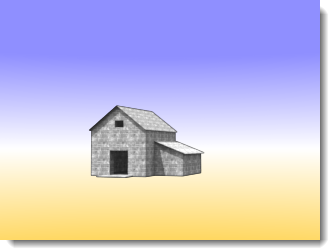
Three-color gradient background: blue, white, yellow.
Clicking a color swatch opens the Select Color dialog box.
The edit boxes indicate the angle where the color will be the most saturated.
To change the gradient color
![]() Click
the color swatches to set the colors in the Select
Color dialog box.
Click
the color swatches to set the colors in the Select
Color dialog box.
To change the range of the gradient color
If the current viewport is a perspective projection, the top and bottom colors and the extents of the gradient relative to the view can be controlled.
![]() Enter
an angle in degrees above and below the horizon in the Top, Middle, or
Bottom boxes.
Enter
an angle in degrees above and below the horizon in the Top, Middle, or
Bottom boxes.
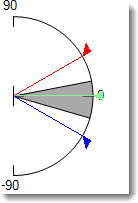
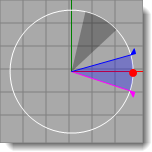
Or, drag the angle markers in the angle graphic. A cone of vision is displayed in the graphic as a light gray shaded region. The angle filled by the background is displayed in the graphic as a light gray shaded region. The red flag indicates the angle where the Top color will be the most saturated. The blue flag indicates where the Bottom color will be the most saturated. For three-color gradients, the green flag indicates the angle where the Middle color is most saturated. |
|
Reverses the color order for the gradient.
Sets the angles of the gradient extents to match the viewport.
A background image is projected onto the background.
You can use a digital photograph, a scanned artwork, or an image created with an electronic paint program. For best results, use high-resolution images for background images. It is also a good idea to blur and lighten sharp images to simulate natural focus and aerial perspective.
![]() Place the
model into an existing context.
Place the
model into an existing context.
![]() Add panoramic
city or mountain skylines.
Add panoramic
city or mountain skylines.
![]() Add surrealistic
effects.
Add surrealistic
effects.
The image can be mapped to a planar, cylindrical, or spherical shape or offset using coordinates or the visual graphic.

![]() Click
the button to select
an image.
Click
the button to select
an image.
Note
Refresh the image definition
When a bitmap file is changed using an image editor such as Photoshop, you must refresh the bitmap definition in Flamingo nXt.
To refresh the bitmap
 On the Flamingo
nXt menu, click Utilities
> Clear bitmap cache.
On the Flamingo
nXt menu, click Utilities
> Clear bitmap cache.
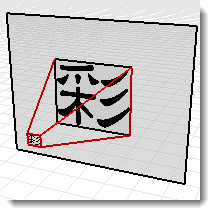
Three types of background image projections are supported: Planar, Cylindrical, and Spherical. Each projection method has its own set of controls for positioning the image.
Projects the image to a flat background.
![]() Drag the
pink rectangle or use the numerical controls to move or scale the background
image.
Drag the
pink rectangle or use the numerical controls to move or scale the background
image.
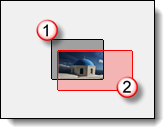
Background area (1), image size and shape
(2).
Planar Options
XScale / YScale
Specifies the size of the background image.
XOffset / YOffset
Specifies the offset of the background image from the lower left corner of the viewport.
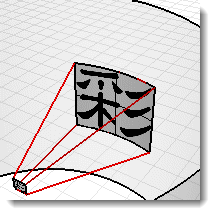
Cylindrical projection maps the image to an imaginary cylinder that surrounds the model. While this projection works best with true cylindrical images, it can also be used effectively with standard panoramas built from photographs.
Specify the size and position of the image map in height and width angles. Use the graphical tools and the mouse to position and size the image. The current cone of vision is displayed in the graphic as a light gray shaded region.
Width
Specifies the angular width of the image map. Enter an angle or drag the flags in the control widget to set the width. The blue area indicates the extents of the angular width.
Top / Bottom
Specifies the vertical extents of the image. Enter an angle or drag the flags in the control widget to set the top and bottom angles. The cylindrical projection is limited to 45 degrees above or below the horizon.
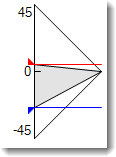
Rotation
Specifies the image rotation and extents. Enter an angle or drag the control widget to set the rotation. The red dot indicates the center of the image. The gray area indicates the view.
Sets the Width and Top/Bottom angles to match the viewport.
Spherical projection maps the image to a complete sphere. This method generally produces good results only if with an equirectangular spherical image.
Rotation
Specifies the image rotation. The red dot indicates the center of the image.
Sets the rotation angle to match the viewport.
High-dynamic-range images provide lighting from luminance information stored in the image.
Using an HDR image as an environment allows more control over the relationship between the light in the background and other light in the image. This is especially useful for depicting an interior space with a bright exterior space showing through a window.
An HDR environment image has more range of light than a normal bitmap image and can be assigned a channel so the contrast can be managed in a multi-channel rendering.
![]() Click
the button to select
an image.
Click
the button to select
an image.
Rotation
Rotates the image so a different part of the image lights the model.
Mirror
Reverses the image from left to right.
Sun channel
The sun channel.
Sky channel
The sky channel.
Planar high-dynamic-range images provide both an image background and lighting. These are often used outside windows in architectural renderings where light from the exterior is required.
![]() Click
the button to select
an image.
Click
the button to select
an image.
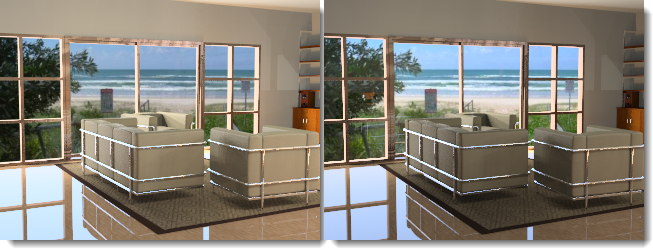
Background image (left) and Planar HDR (right) shows subtle lighting difference in background.
Sun channel
The sun channel.
Sky channel
The sky channel.
The Advanced Background settings control environments that are not visible in the rendering, but show in reflections and refractions for the objects.
In the illustration, the background is black, but the reflected environment is an HDR image of a building interior.
A reflected environment is not visible in the rendered image, but it reflects in shiny objects.
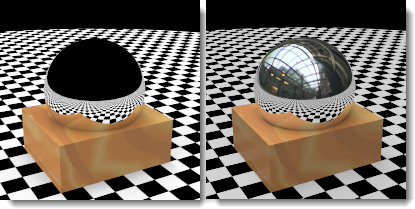
Normal environment (left) and reflected HDR sky environment (right).
Sky
Objects reflect the sky as specified in the Lighting: Sun and Sky settings.
Custom
Objects reflect a Color or gradient, Image, or HDR background.
Visible Background
Objects reflect the visible background as specified in the Environment settings.
Sky
Objects refract the sky as specified in the Lighting: Sun and Sky settings.
Custom
Objects refract a Color or gradient, Image, or HDR background.
Visible Background
Objects refract the visible background as specified in the Environment settings.
Prevents seeing alpha channel through transparent objects and will prevent alpha channel compositing through transparent objects.
If images will be pasted into the alpha channel, turn this setting off.